On this episode, Lazina walks us through how to get started with Fiore, an IoT irrigation demonstration kit designed by Future Electronics in partnership with STMicroelectronics. The Fiore platform consists of two boards with all key components like MCUs, sensors, power and wireless communication devices manufactured by STMicroelectronics.
The Main Board (watering can board) senses the soil moisture levels and automatically communicates with the Companion Board (flower board) which controls a submersible water pump to start and stop watering the plant. The Companion Board also contains motor current monitoring, tank water level monitoring and leak detection functions. User can wirelessly access the system via Bluetooth to get real time sensor data including humidity, temperature and pressure
To see the board go to:
https://www.futureelectronics.com/future-development-boards/fiore-demonstration-kit
To sign up and qualify for a board, go to:
https://www.futureelectronics.com/future-development-boards/fiore-demonstration-kit#sample-form
See the video or read the full transcript below.
Toggle transcript
How does BLE technology help an IoT irrigation system? Join me on this episode as I show you how to get started with the Fiore board, an IoT irrigation demonstration kit featuring key components from ST Microelectronics like MCUs, sensors, power, and wireless communication devices.
Hi! Welcome back to TechVentures.
My name is Lazina, and I’m a Technical Marketing Engineer at Future Electronics.
If you are interested in checking out any previous TechVentures videos, then please click the link on the screen or check out the description box below.
Fiore is an IoT irrigation demonstration kit designed by Future Electronics in partnership with ST Microelectronics. The Fiore platform consists of two boards with key components like MCUs, sensors, power and wireless communication devices manufactured by ST Micro.

The Main Board which is shaped like the watering can, senses the soil moisture levels and automatically communicates with the Companion Board, which is shaped like the flower board. The latter controls a submersible water pump to start and stop watering the plant. The Companion Board also contains motor current monitoring, tank water level monitoring and leak detection functions.
We can wirelessly access the irrigation system via Bluetooth to get real time sensor data including humidity, temperature, and pressure. We’ll talk about that later.
I’m going to show you how to get started with the Fiore IoT irrigation system.
In the box we have:
1. The main board that’s shaped like a watering can, the companion board that’s shaped like a flower.


2. Water hose tubes, electric wire pairs, a little plastic plate, a manifold, and a submersible pump
3. A 10-wire flat interface cable
We will also need to download the STBLE Sensor Classic app.

https://apps.apple.com/us/app/st-ble-sensor/id993670214
https://play.google.com/store/apps/details?id=com.st.bluems&hl=en_CA&gl=US
And the NFC tool app

https://apps.apple.com/sa/app/nfc-tap/id1278913597
https://play.google.com/store/apps/details?id=com.wakdev.wdnfc&hl=en_CA&gl=US
To put all this together, first we need to assemble the water leak probe.
On the Fiore main board, notice this little rectangle that says water leak, you can break off the board. It’s recommended to use cutters or an exacto knife.
Grab the small plastic plate, and align the 2 center holes of the PCB with the bottom side of the water leak detector board probe.

1. Connect the electric wire pair to the water leak probe.

- Split the wire pair at one end for a length of approximately 1”.
- Insert fully these 2 wire ends (no need to strip them) into the IDC connector (J3) side holes marked 1 and 2 on the Water Leak Probe PCB. There is no polarity. Insert any wire at either position.
- When both are fully inserted, press down firmly on the top part of the IDC connector, until it is fully seated down in the bottom part, to make the connection.
- Strip the opposite free ends of those wires (~0.25”).
- Connect these ends into the Companion (Flower) Board at Terminal Block (J2). There are no polarities so, we can connect any wire at any position.
The Water Leak Detector Probe would typically be installed near the bottom of the flowerpot, that is, wherever the Watering Can will be watering the plant.
2. Next, we need to assemble the water hose and pump.
- Connect one end of the thicker hose to a port opening of the Plastic Manifold.
- Connect one end of the thinner hose to the matching port of the plastic manifold adapter.

- Connect the free end of one of the thick hose (either one) to the Submersible Water Pump output port like so.

3. Next, using the 10-pin flat wire interface, connect the watering can to the companion flower board. Verify pin 1 goes to pin 1 at each end.

4. Connect the Water Pump’s electrical wires to the connector (J1) on the Companion board (Flower).
- Make sure to connect the red wire to the “+” pin on (J1) and the black wire to the “-” pin
5. Connect the free end of the small hose (1.5mm ID) to the pressure sensor port (U4) on the Companion board (Flower). Make sure to insert it fully into the hose to avoid leaks.
Warning: if you’re operating the demo with water, always verify that the tube remains fully seated, especially after handling the board as water may flow out of the hose when the pump is activated.
6. On the Main Board (Watering Can), make sure the Power switch is set to the OFF position, and insert the 3x “AA” alkaline batteries in the battery holder. Alternatively, the system can be powered through the Type-C USB connector (J1)
7. This concludes the hardware assembly, now let’s see this in action!
I’ve got a container, filled with water and this represents the water tank. I’ve already put the submersible pump inside. It’s connected to my flower companion board. The other terminal block is connected to the water leak detector. We’ll put this in the flowerpot to simulate detecting an excess of water.
The Flower board typically rests above the water container to monitor the water level.

I’ve got the plastic manifold inside the container, and for demo purposes, I’ve got the water hose putting the water back into the container.
And the free end of the thin hose is connected to the water pressure sensor port.
The watering can is connected to the flower companion board through this 10-pin flat wire, through this interface.
The main board electrodes have been placed into the soil for moisture level detection. For demo purposes these are very short, in reality, they would be made much longer to sense soil moisture at a greater depth.
Let’s just double check that all the electrical and water hoses are connected.
Before powering on the system, especially the first time, be ready to power it off quickly in case there are water leaks.
Switch on the system by sliding this switch to the ON position.
At rest, the Flower board continually measures the Water surface distance using a ToF sensor(VL53L4CD) and indicates if the water level is too high or too low by blinking its RGB LED(LED1) accordingly.
Red blinking means there is low water level.
No blinking means normal water level.
Yellow blinking means high water level.
Out of the box, the default mode is set to Manual irrigation mode.
The irrigation mode can be changed between manual and automatic by writing a text record via the on-board NFC tag on the watering can.
To see the currently set Irrigation mode, read the NFC Tag with your phone or Tablet. This can be read while the watering can is powered-off or powered-on.
In manual mode, the pump is solely controlled through Gesture Detection, via the Time-of-Flight sensor on the Watering Can Board, using TAP or SWIPE Gestures.
In automatic mode, the Pump is controlled automatically via the Moisture sensing probes (“legs”) of the Watering Can board.
The Automatic Mode can be temporarily overridden manually by Gesture Detection via the ToF sensor.
To start the pump manually, do a single TAP gesture toward the ToF sensor on the watering can. The pump will start and run for a max run time set to 10 secs, and then timeout for 10secs before it can be activated again. This avoids accidental overwatering or spillage.
To stop the pump manually when started with a start/tap gesture, do a simple swipe by passing your hand over the sensor once, in any direction.
To stop the pump manually when it was started automatically, tap, then swipe.
A feature that might be interesting to know is that the TOF sensor on the Watering Can board, has an integrated ambient Light sensor. In this OOB demo, the ambient light level is monitored every 10 seconds. if the ambient light level is below a preset level, the relay will be automatically activated, for example, to turn on an external LED light.
The Fiore ecosystem showcases the STM32WB module, I have a video explaining the module more in depth, if you’re interested, you can find the link in the description box.
Earlier I mentioned we’ll need the ST BLE Sensor Classic app, let’s go ahead and open it. The app helps facilitate various sensor readings on the main board. The app is provided by ST Microelectronics and we’re using as it was found on the google play store and apple app store. It’s easy to use and no code modification was needed. We’re able to see our actual sensor data on the app.
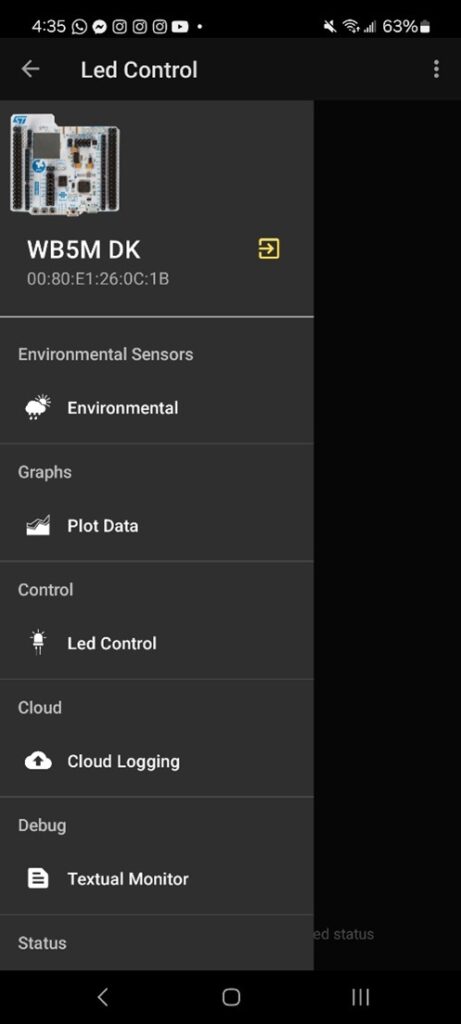
You’ll be greeted with a screen like so, select “connect to a device”
A “WB5M DK” should appear on the screen, select it.

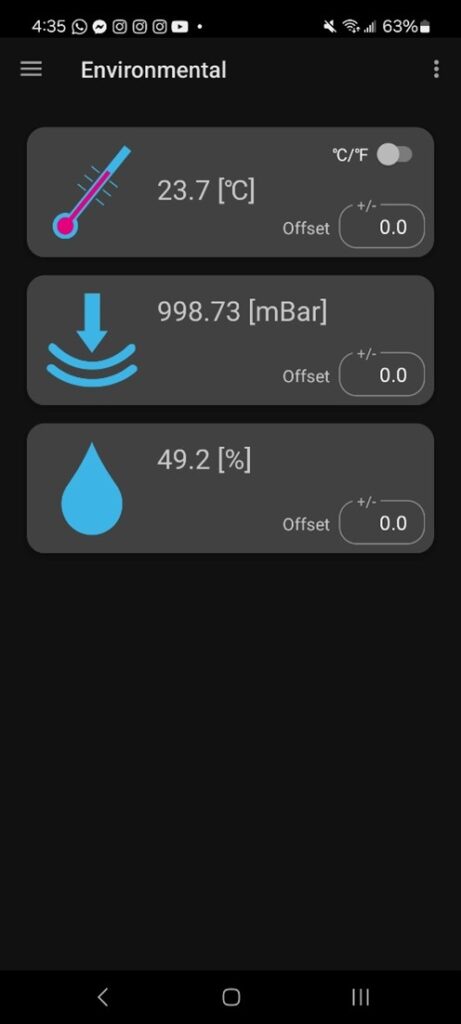
Once connected, select the three lines at the top left-hand corner, select the environmental section to see sensor readings for ambient temperature, water pump pressure and soil moisture/humidity.
An interesting feature is the watering can (main board) has a relay connector. The LED control section of the app controls this relay. I’ve got mine connected to a beautiful sunflower. If I touch the LED icon, the light goes on and if I select again, it is off.


Well, there you have it, now you know how to get started with the Fiore board. If you’d like more information on the smart irrigation board, please feel free to reach out to your local future electronics representative or visit us online at futureelectronics.com.
Thanks for watching, and I’ll catch you next time on TechVentures with Lazina!


